
Lets see the steps.
1. Download the goldengate software for the appropriate os platform.
2. unzip the V46695-01.zip and execute runInstaller [both SOURCE & TARGET ]
[oracle@presplaySRV210 sf_stuff]$ unzip V46695-01.zip
[oracle@presplaySRV210 sf_stuff]$ cd fbo_ggs_Linux_x64_shiphome
[oracle@presplaySRV210 fbo_ggs_Linux_x64_shiphome]$ ls -ltr
total 0
drwxr-xr-x. 5 oracle oracle 66 Aug 7 2014 Disk1
[oracle@presplaySRV210 fbo_ggs_Linux_x64_shiphome]$ cd *
[oracle@presplaySRV210 Disk1]$ pwd
/media/sf_stuff/fbo_ggs_Linux_x64_shiphome/Disk1
[oracle@presplaySRV210 Disk1]$ ls -ltr
total 12
drwxr-xr-x. 4 oracle oracle 4096 Aug 7 2014 install
drwxr-xr-x. 11 oracle oracle 4096 Aug 7 2014 stage
-rwxr-xr-x. 1 oracle oracle 918 Aug 7 2014 runInstaller
drwxrwxr-x. 2 oracle oracle 24 Aug 7 2014 response

[oracle@presplaySRV210 Disk1]$ ./runInstaller
Starting Oracle Universal Installer...

Checking Temp space: must be greater than 120 MB. Actual 19865 MB Passed
Checking swap space: must be greater than 150 MB. Actual 2063 MB Passed
Checking monitor: must be configured to display at least 256 colors. Actual 16777216 Passed
Preparing to launch Oracle Universal Installer from /tmp/OraInstall2015-08-12_11-56-59AM. Please wait ...[oracle@presplaySRV210 Disk1]$
You can select whether your database is 11g or 12c.
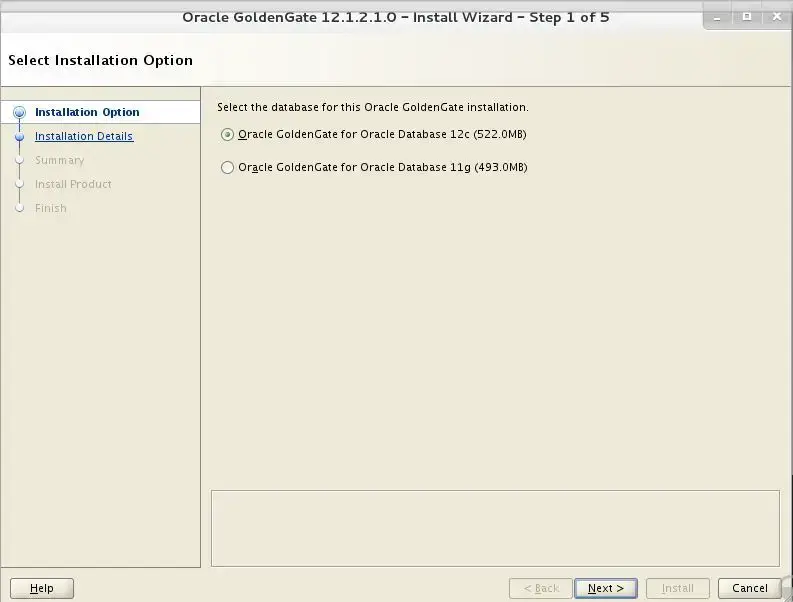
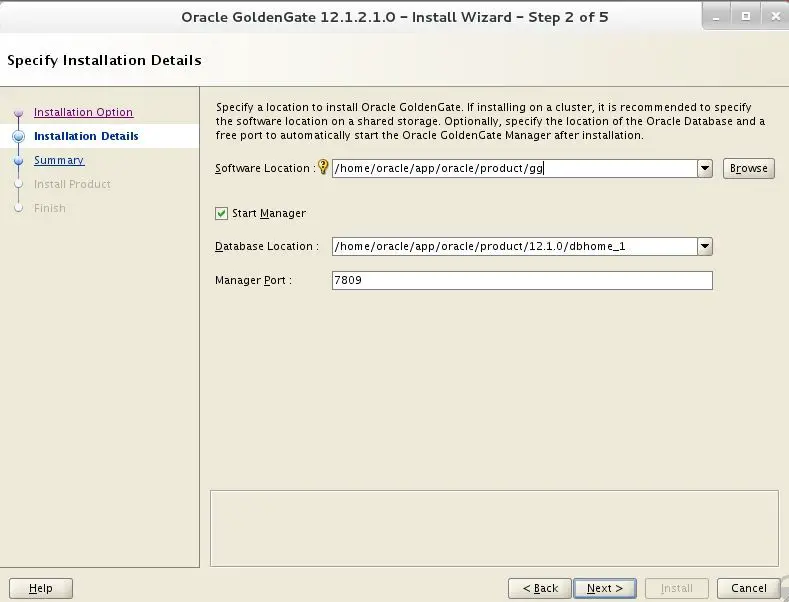
Software Location – This will be the goldengate Home location
Database Location – This is your database Home location
Manager – If you select start manager and the specify the port, then once installation is done, manager process will be started automatically.
[oracle@presplaySRV210 gg]$ ./ggsci
./ggsci: error while loading shared libraries: libnnz12.so: cannot open shared object file: No such file or directory
[oracle@presplaySRV210 gg]$ export LD_LIBRARY_PATH=$ORACLE_HOME/lib
[oracle@presplaySRV210 gg]$ ./ggsci

Oracle GoldenGate Command Interpreter for Oracle
Version 12.1.2.1.0 OGGCORE_12.1.2.1.0_PLATFORMS_140727.2135.1_FBO
Linux, x64, 64bit (optimized), Oracle 12c on Aug 7 2014 10:21:34
Operating system character set identified as UTF-8.

Copyright (C) 1995, 2014, Oracle and/or its affiliates. All rights reserved.

GGSCI (localhost.presplaySRV210) 1> info all

Program Status Group Lag at Chkpt Time Since Chkpt

MANAGER RUNNING
---------------
3.Create tablespace on both Source and Target Databases
SQL> create tablespace ggate_TBS datafile '/u02/oradata/EODD4/ggate.dbf' size 5g autoextend on next 500m maxsize 10g extent management local segment space management auto;
4. Create database user for goldengate on extract side [ SOURCE DB]
Create a database user that is dedicated to Oracle GoldenGate Manager, Extract, Replicat processes. It can be the same user for all of the Oracle GoldenGate processes that must connect to a database. In our case the user is “GGATE_USER”
SQL> create user ggate_user identified by ggate_user default tablespace ggate_TBS;

----Assign the correct privileges to the Oracle GoldenGate database user as shown below
grant create session, alter session to ggate_user;
grant connect,resource to ggate_user;
grant select any dictionary to ggate_user;
grant flashback any table to ggate_user;
grant select any table to ggate_user;
grant create table to ggate_user;
grant execute on dbms_flashback to ggate_user;
grant select any TRANSACTION to ggate_user;
grant LOCK ANY TABLE to ggate_user;
grant execute on utl_file to ggate_user;
5.Create database user for goldengate on replicat side [ TARGET DB]
SQL> create user ggate_user identified by ggate_user default tablespace ggate_TBS;

SQL> GRANT DBA TO GGATE_USER;
6. Enable archivelog mode for the database [SOURCE DB]
Make sure the database is in archive log mode: – How to enable archive mode
7.Enable supplemental logging at database level [SOURCE DB]
Usually, insert and delete statement involves complete row change. But update can be done on a particular set of columns. So Redo logs don’t capture sufficient information for update statements, i.e Oracle logs only changed columns for update operation in the redo. Without sufficient info , goldengate can’t find which row to be updated. So supplemental logging enables in capturing additional information for update operations in redo logs.
Below command will enable a minimum level of supplemental logging at the database level.
SQL> ALTER DATABASE ADD SUPPLEMENTAL LOG DATA (ALL) COLUMNS;
Database altered
8.Enable force_logging for the database [ SOURCE]
alter database force logging;

select force_logging from v$database;
9.Check the gg login [SOURCE & TARGET]
GGSCI > dblogin userid ggate_user, password ggate_user
Successfully logged into database.
10.Create checkpoint table on REPLICAT side [ TARGET]
ggsci> add checkpointtable ggate_user.testcheckpoint
11.Update ./GLOBALS file on REPLICATE side [ TARGET]
cat ./GLOBALS
GGSCHEMA ggate_user
checkpointtable ggate_user.testcheckpoint
ALLOWOUTPUTDIR /ggate/oradata/datacapture/TRG
Where ALLOWOUTPUTDIR is the path in the replicate side, where trail files will be copied.
With this installation of goldengate with required basic configuration has been completed.


